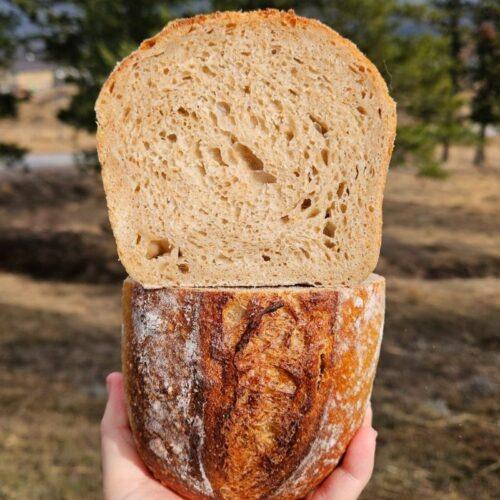
Soft Honey Bran Sourdough Sandwich Bread
The perfect loaf for anyone who loves a wheaty and slightly sweet flavour! This Honey Bran Sourdough Sandwich Bread is one of my favourites—it’s soft, slightly chewy, sweet, and full of rich, fermented flavour. Perfect for sandwiches, toast, French toast, or even bread pudding!
Ingredients
- 300g Active Sourdough Starter
- 500g Water
- 500g White Flour
- 250g Whole Wheat Flour
- 50g Honey
- 1/2 cup Bran
- 20g Salt
Instructions
- Prepare the Dough: In a sturdy mixing bowl, add the lukewarm water, honey, and active sourdough starter. Use your hands or a spatula to break up the sourdough starter and honey into small, shaggy pieces.
- Mix the Flours & Initial Rest: Add the white flour, whole wheat flour, and bran to the mixture. Mix until everything is fully incorporated and no dry bits remain. Cover the bowl and let the dough rest for 1 hour (autolyse).
- Add Salt: Sprinkle the salt over the dough and add a small splash of water. Squish it in with your hands until the salt is completely dissolved and evenly dispersed throughout the dough. Let rest for 30 minutes.
- Strengthen the Dough (Stretch & Folds): After 30 minutes, perform the first round of stretch-and-folds. Stretch the dough from one side, fold it over itself, and repeat 4-8 times until the dough feels tighter and stronger. Cover and let it rest for another 30 minutes. Repeat the stretch-and-fold process once more, making a total of two rounds. The dough should feel smooth and elastic after the second round. Cover and let it rest for bulk fermentation.
- Bulk Fermentation: Let the dough rest at room temperature until it has nearly doubled in size. In a cool kitchen (below 68°F/20°C), this may take 10-12 hours, while in a warm kitchen (above 75°F/24°C), it may take 4-6 hours.
- Shape the Dough & Bench Rest: Turn the dough onto a lightly floured counter. Divide it into two equal portions using a scale or by eye. Shape each portion into a round ball and let them rest for 30 minutes. If the dough still feels tight after resting, allow it to rest for an additional 30 minutes.
- Prepare Loaf Pans: For non-stick loaf pans, no prep is needed. For regular pans, grease with butter and flour, or line with parchment paper.
- Final Shaping & Cold Proof: Flip each dough ball over so the smooth side is down. Gently shape each loaf into a log by folding in the sides and rolling it into a tight, smooth loaf. Place the shaped dough seam-side down into the prepared loaf pans. Cover and place in the fridge for 8-24 hours for a cold proof.
- Bake the Bread: Preheat the oven to 500°F (260°C). Place a metal baking tray or muffin tin at the bottom of the oven with water to create steam.
- Remove the loaves from the fridge, lightly dust the surface with flour, and score the tops with a sharp knife or lame.
- Place the loaves in the oven and close the door quickly to trap the steam. Lower the oven temperature to 375°F (190°C) and bake for 40-45 minutes, or until the crust is golden brown and crispy.
- Cool & Enjoy: Once baked, remove the loaves from the oven and transfer them to a cooling rack. Let them cool for at least 1 hour before slicing. Enjoy with honey butter!
Notes
- Using a kitchen scale is recommended for the most accurate results.
- Hydration is about 74%, so expect a slightly sticky but manageable dough.
- Every oven is different, keep an eye on your loaf during baking to ensure it's not getting too dark too quickly.